Thursday, 27 October 2011

A welcome of sorts :)

So welcome to my inaugural post as a Stampin' Up! © demonstrator!! :)

Today I've got a few cards I've made with my limited collection of new Stampin' Up! supplies...


This card was made using the hostess stamp set "Faith in Nature", and I have masked the sentiment over the pear stamp. The cardstock is Whisper White and Marina Mist. The inks used are Marina Mist and Early Espresso, and the card is finished off with some blingy bits...


This card was made using Tempting Turquoise cardstock, Paisley Petals DSP, Kindness Matters stamp set inked up using Early Espresso, and the Sizzix Bigz die Scalloped Envelope, finished off with some pearls....


Lucky last, this was made using Real Red and Whisper White cardstock, Real Red ink (I've "triple-stamped" to create the multi-coloured effect), and the Just Believe stamp set.

Thanks for stopping by!

Saturday, 1 October 2011

All things pink and girly

Hi there

So I've been AWOL for a while now :)

Anyway, I'm back today with a very pink and girly card!


The image is La la land Princess Marci, coloured with Copics, and Atyou Spica on her crown. The papers are Kaisercraft new Bonjour collection, and the edge of the card has been punched using XCut floral doiley punch.

So a nice simple card today :)

I would like to enter the following challenges:

Anything goes - Challenge 50

Stampin' for the weekend - Challenge 17 What a Cutie

Thanks for stopping by today :)

Wednesday, 24 August 2011

All things vintage and glam...

Soooo.... Back to my FAVOURITE style - VINTAGE!!!! I absolutely lurve it :)


Okay, the front layer! White cardstock that I stamped with Butterfly Garden Le Jardin stamps. I distress-inked it in DI Brushed Corduroy and then around the edges with Versacolour Pinecone. Matted some cream lace onto some pink lace.

The sentiment is a Melissa Frances Tag that I die-cut with the new XCut labels die, and added a butterfly.

Inside I have added a giftcard pocket which I embossed with a Cuttlebug embossing folder 'Goochie Script', and then ran an emery board over it to distress it down a bit.


And here is a close-up of the beautiful little butterfly


I would like to enter this card in the following challenges:

Cupcake Crafts - A Gift Card
CRAFTS AND ME - Lace
Crafty Catz Weekly Challenge - Pink & Brown

Thanks for stopping by! :)

Melody Wishes You...

Finally I have stepped away from the masculine projects - for now at least :)

This card was a card I made for my daughters' creche director for her birthday. DH bought me a Grand Calibur as a **very** early birthday present and I couldn't wait to give shaped cards a go!

Small confession - I purchased the cardstock, papers etc as a kit so I have no idea what they actually are. The green cardstock is embossed, and that's pretty much all I can tell you! Sorry :)

The stamp is Crafts And Me 'Melody Wishes You', and coloured with Copics.

Here is a close-up


The dies used were Spellbinders Grand Nestabilities Grand Labels One, and Spellbinders Lacy Edged Ovals.

I would like to enter my card in the following challenges:

Saturday Challenge - Create a Scene
One Stop Craft Challenge - Bold and Bright

Thanks for stopping by :)

Nuts & Bolts

Today I have my first EVER attempt at an ATC (Artist Trading Card). The requirement was 'Garage', and having a DH who is a mechanic gave me a chance to brainstorm a few ideas, here is what I came up with :)


The background paper is the same I used in my previous post (Tim Holtz Idealogy Lost & Found). I punched some bronze, gold and silver eyelets into the card to represent nuts.

The 'oil stain' is actually a Copic BV29 "splodge" covered with some Dimensional Magic to make it slick like oil. The sprockets are just chipboard that I coloured with Copics (the right one is E57, the left one is C7). I then covered both with Dimensional Magic, and when dry, I sanded the brown one down a little bit so it was shiny and dull in different parts, to look like it was rusting. I inserted a brad "screw" in the right one as well.

To finish, I inked around the edge of the ATC with Versacolour 'Pinecone'.

Thanks for stopping by!

Tuesday, 23 August 2011

Another masculine card

Howdy :)

I'm on a bit of a roll with these masculine cards ;)


I ordinarily avoid buying specific stamps, preferring to buy stamps I know I will use over and over, but when I spotted this little beauty at my local craft fair, I had to have it (plus I had a very excited DH in the background encouraging me to buy it, lol)!

I distressed all the edges and inked with DI.

For the lovely ladies over at Top Tip Tuesday, my tip for this week is to stamp your image with the SAME DI that you distress with, as it gives a nice co-ordinated finish, without "blending in" too much!

The papers are Tim Holtz Idealogy Lost and Found
Tags are Melissa Frances Mini Flash Cards
Stamp is Dark Room Door Old Truck Photo Stamp
DI is Brushed Corduroy

I would like to enter the following challenges:

Top Tip Tuesday Challenge 48 - Masculine Card
Papertake Weekly - Dies to Die For
A Spoon Full of Sugar Challenges - Challenge 162 - Happy Birthday

Thanks for stopping by :)

Saturday, 13 August 2011

A beautiful day is...

I hope the weekend finds you well, wherever you are in the world :)

Today's card is a more masculine card, and I have to say, it was nice to veer away from my "usual" sketch, of stamp in the right, and ribbon to the left, with patterned paper at the back, lol.


The paper is Kaisercraft Hunt and Gather, which I have embossed with an Ez-Cut embossing folder. The stamp is a 'Verses' stamp, and inked with Distress Ink Brushed Corduroy, then DIed around the edges.

I would like to enter this card in the following challenges

Cute Card Thursday Challenge 117 - Clean & Simple
Top Tip Tuesday Challenge 46 - Straight Edges
Charisma Cards Challenge 32 - Distressing
Crafty Catz Weekly Challenge 95 - Emboss It

Enjoy the rest of your weekend! :)

Friday, 29 July 2011

Top Tip Challenge 44 - "Make It Girly"

First of all, I wouild like to send a very special shout-out to the lovely ladies over at Top Tip Tuesday, who inundated me with lovely comments on my previous card... So thank you very much ladies, and to everyone else who left a comment :)

... And here is my card for today :)


This card was loads of fun to make, and surprisingly quick (Copic colouring aside :) ).

I absolutely LOVE fussy cutting, and as Xpress Blend paper is *slightly* dearer than plain paper, it is a great way to maximise your paper usage, so that is my TIP for the week. So I have fussy cut little CC Designs Swiss Pixies Cute Birgitta and mounted her onto Fancy Pants "Beach Babe" papers.

Here is a close-up of Birgitta


I don't have the list of Copic colours I used handy, but if you would like to know, please leave me a comment and I will work it out and get back to you :)

The rest of the materials used are:

Sweet Shoppe "Sugar On Top" papers
Pink Grosgrain ribbon - HOW GOOD IS THAT STUFF?!?!?!
Heart buttons (to make the flower, and then either side of the sentiment)
And Martha Steward Scalloped-edge punch - another AWESOME product!

I would like to enter this card into the following challenges:

Top Tip Tuesday - Make it Girly
Allsorts Challenge - Week 113 Free and Easy

Thanks for stopping by!

Smiley Girl

So I have been AWOL for a litle while... My bad :) But now I have two layouts for you today, one scrapbook page and one card...

This scrapbook layout is of my youngest daughter Grace. I'm really trying to steer away from "cutesy" as my kids get older (okay, she's 1, but you can only do "nursery newborn" layouts for so long :) ). So I decided to make it really bright and funky, to match the feel of the photos.


The little photos in the corner are leftovers from the exploding boxes I posted earlier. It was so hard to choose photos for those boxes, so I decided to keep them for future pages :) I have matted them onto a Cheery Lynn "French Pastry" doily die that I purchased through Lime Tart.

The journalling next to the doily die was made using my label maker (yes, I cheated, but it makes the journalling stand out from the busy page, plus it's an economical way to journal :) )


The Title "Smiley Girl" was made using Echo Park "Dots and Stripes" alpha stickers, matted in cardstock punched with the MArtha Stewart Lacy Edged punch (I used the corner punch to make it more ornate), and chopboard letters inked and coated with Dimensional Magic for shine.


The rest of the materials used were:

Kaisercraft "Fun In The Sun" papers, rhinestones and droplets
Blossoms and Butterflies Chipboard Ornaments
Sassafras entwined blooms

Thanks for stopping by today :)

Wednesday, 6 July 2011

Let's Get Married...

Back again! Nothing like a few challenges to get the creative juices flowing :)

Today I have an engagement/wedding card I made for a friend of my parents. I was actually asked to do this a few weeks ago but was struggling to come up with something I would be happy to give to someone. Engagement cards should POP as far as I'm concerned :)

*GASP* It's a clean mat now too ;)

Anyway, the info you are after goes as follows:

Cream pre-embossed Bazzill cardstock, and some gorgeous linen paper make up the back of the card, the images are from Graphic 45 Le Romantique collection (get ready for quite a few projects from these papers, they are GORGEOUS!) matted onto the same cream cardstock as the card itself.

A white flower in the bottom left corner which I sprayed with Tattered Angels Iridescent Gold Glimmer Mist, an  Epoxy Brad from Kaisercraft Dutchess collection, and the third embellishment was a little "stamp" I cut from a Le Romantique sheet, and covered with Dimensional Magic to give it some gloss. I couldn't get a good enough picture of it, but hopefully this close-up does it some justice


All edges have been distress-inked, even the linen paper! TIP: If you are going to DI linen paper, just VERY GENTLY AND LIGHTLY pat the sponge around the edges, as it will absorb it really well, and it will only ruin the delicate paper to have a big splodge of ink there.

I would like to enter my card in the following challenges:

Top Tip Tuesday Challenge 41 - Wedding or Anniversary (it's for a wedding)
Sketch Saturday Week #162
Craft Your Days Away Vintage
Stamping for the Weekend My Favourite Things: Graphic 45, Epoxy brads, Distress Ink, Dimensional Magic, Glimmer Mist

Tuesday, 5 July 2011

Get well...

Firstly, I would like to say thank you very much for the lovely comments I received on my previous card, I really appreciate it, and it definitely boosted my confidence level, as I still consider myself a fairly new crafter :)

On to today's project! This card gave me the opportunity to try some new products and techniques that I haven't used before, and I have to say, I am really happy with how it turned out!

The image is Vintage Ladies Collection, coloured with Copics, and I have paper-pieced her dress.

The papers (background and her dress) are Graphic 45 Le Romantique, as well as maroon and white cardstock. I have used my Martha Stewart Scalloped Edge punch on the background paper.

The tag was stamped with Hero Arts Art, Life & Beauty stamp, Brushed Corduroy Distress Ink, and then DI-ed around the edges in the same ink.

I have finished it off with some lace, pearls, a metal coil and Capella Micro Mono stickers. I have also Distress Inked all the edges. FYI, the DI bled slightly on my Xpress Blend It card, but otherwise worked well.

Here is a close-up of the stamped image


And here is a close-up of my tag. I'm actually really proud of this tag, as it is the first time I have successfully distress-inked :)
I would like to enter my card in the following challenges:

Mojo Monday 198 - sketch challenge
Allsorts Challenge Blog - Week 110 Free and Easy July
One Stop Craft Challenge - Week 138 Tag You're It

Thanks for stopping by!

Tuesday, 28 June 2011

Cute Card Thursday - Challenge # 170

Here I have my next attempt at a Cute Card Thursday challenge! I have also entered my first Top Tip Tuesday challenge!

The CCT theme was a sketch, and the TTT theme was "T". Here is the card I made:


The papers are The Girls Paperie Vintage Whimsy, I have distress-inked all edges using Tim Holtz Distress Ink in Old Paper, and the "buttons" and sentiment are cut using Spellbinders Circles. The sentiment is Darkroom Door Art de Fleur collection, and I have used some lace and pink gems around the edge. It's all backed on to baby blue and white cardstock.

I would like to enter my card in the following challenges:

Cute Card Thursday - Challenge #170 - Sketch Time

Top Tip Tuesday #40 - T is for.... Challenge

Oh, and if you were wondering, my "T" was for "three", as I have 3 of a few things on my card :)

Thanks for stopping by!

Wednesday, 22 June 2011

Cute Card Thursday - Challenge #169 Birthstones

This is my first challenge I am entering, and I'm a bit excited :) This week's Cute Card Thursday challenge is Birthstone. I had two birthstones to choose from - Garnet and Emerald, and I chose emerald, because I found garnet really difficult to match up within my stash...


I have used emerald green and white cardstock, a sheet from the Linen Closet Stack, pearlescent paper, Kaisercraft Mini Clear Stamp, Tuxedo Black Memento Ink, Copics G00, G02, G07, and green grossgrain ribbon.

I would like to enter the following challenges:


Monday, 20 June 2011

Ballerina girl


I did this card for a friend of my sister. I purchased the papers and embellishments from Lime Tart as part of the June Full Tart kit. I absolutely love anything vintage and girly, so I couldn't wait to snap up this gorgeous kit!

I found the layout from Colleen's blog, and adapted it (slightly :) ), so thank you very much Colleen for the inspiration!

The pretty little lady is La-La Land Crafts Marci Ballerina, and coloured in with Copics.

The papers are The Girls' Paperie vintage whimsy, and I have added a tag, a few ribbons, and a pearl brad.

Here is a close up of the little ballerina, I mounted her using foam tape so she would "pop"!

Tuesday, 31 May 2011

Floral delight!

I have my MIL's birthday coming up, and I know she likes a "clean" card, rather than a card overloaded with embellishments and detail, so I wanted to keep it really simple for her, but nice :)


I used yellow and white cardstock, as well as free papers (My Craft Studio) from Creative Cardmaking magazine, and finished it off with 4 pearls. The top panel has been matted using foam tape so that the two layers of patterned papers don't blend in together.

I love my craft magazines, especially the ones that come with free goodies such as papers, die cut elements, etc. I have a stack of papers a few inches thick that I absolutely love! I am delving into the world of paper pads, and have a few gorgeous Graphic 45 ones on order, so stay tuned for some Steam Punk goodness down the track :)

Hope you enjoy, and thanks for stopping by! :)

Male birthday card!

Cards for men are soooo hard to do! It's always tempting to add a flower here, some bling there and before you know it, the card is not quite as masculine as you planned :) This card is for a family member's 21st, so I wanted it to be nice, but masculine.


The image is a digistamp I got from Complete Cardmaking magazine's free cd, and coloured using Copics. The background is plain white cardstock that I scrunched and sponged with Tim Holtz Distress ink in Old Paper. The sentiment was stamped with Versamark Pinecone. And it's all matted onto white and blue cardstock, with a few brad "screws"in each corner.

Copic colours used:

E31, E33, E35, E37, E50, E51, E53
B00, B02, B05
C1, C3, C5

Hope you like, thanks for stopping by! :)

Wednesday, 25 May 2011

Playing with Copics!

I'm very new to the world of Copic markers, and I have to say, I AM IN LOVE!!! There is a plethora of information available through craft shops, craft magazines, the official Copic Australia website, and blogs if you are interested in learning how to use them, or expand on your knowledge. As I am NOT a Copic certified designer, at this time, I WON'T be posting any tutorials, just illustrating what I do (pardon the pun) :)

Firstly, I wanted to show you just how different the same stamp can look with a different light source!

Here we have C.C. Designs Swiss Miss Rosalie with Roses. In the first picture, I have coloured her with the light source coming from the right:


And here I have used her with the light source coming from directly in front of her:

Please forgive the very, VERY rudimentary colouring! :) In both images, I have used the same Copics:

Skin: E000, E50, E53
Hair: E50, E31, E35, YG00, YG02 (YGs for the ribbon)
Dress: B00, B02, B05, R35
Socks: RV10, RV13
Shoes: C1, C3, C5
Roses: R32, R35

Now while some of the more seasoned Copic users might question my using E000 with the two E5* Copics, I was taught that when it comes to Copics, there are no rules! :) And my collection is still fairly limited (25 Copics to-date) so I had to make do with what I had, I'm not unhappy with the results. I have been blog-hopping, and have found that for skin tones, E000, E00, E02 are the most popular choices. I purchased the E00 and E02 today, and I am attending another Copic workshop this weekend, so stay tuned for *hopefully* some better Copic portraiture!

Next (sorry for the long post!), I wanted to show you how effective the "Cool" tones are! I was very reluctant to play with these, as I thought they were a bit of a boring group and wouldn't be very versatile. How wrong I was! I coloured in this gorgeous little Imaginisce Snag 'em Stamps Dolphin stamp: A perfect example of how you won't get the same result twice, even with the same light source!

Please excuse the ink smudge on the left Dolphin!

And FINALLY! I am a huge fan of anything vintage! And when I bought the VERY beautiful set of Hot Off The Press Vintage Ladies stamps, I was a bit concerned that they wouldn't be very versatile. This was BEFORE I started using Copics :) These look great either un-coloured, or coloured, depending on your co-ordinating papers! I haven't put one of these lovely ladies onto a card yet, but I will post pics as soon as I do! :)


Thanks for stopping by today! I hope to bring you more Copic goodness very soon! :)

Sunday, 22 May 2011

Blue and yellow! Hello!

So I made these two cards on different nights, for different people, and somehow ended up with a similar theme! I don't usually go for a "set" of cards at once, but it is always nice to be different :)


IT'S A BOY: I used blue and yellow cardstock, with Grace Taylor baby papers, vellum and sticker from the Nursery Scrapbook In A Kit, and some silver ribbon to finish.


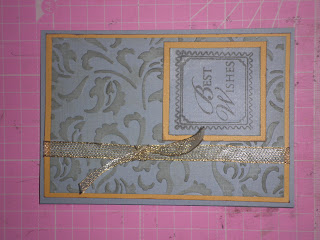
BEST WISHES: Blue and yellow carstock, and the Best Wishes stamp was a freebie in a magazine (gotta love those, lol), and the gold ribbon was actually off a present I had received for my birthday! On the larger blue cardstock behind the sentiment, I embossed it with my Cuttlebug and Venus Embossing Folder, and then inked over the raised image with Tim Holtz Distress Ink in Old Paper.

And of course, both cards have inking around the edges :) I swear I will use my sewing machine one of these days!!!

Have a great day! And thanks for stopping by :)

Sunday, 15 May 2011

Lights, camera, ACTION!!

Here is a scrapbook layout I did of my gorgeous little 1 year old, Grace. With her other pages, I have gone for girly, cutesy styles. But because of how funky this photo was, I wanted a funky layout to match!

The papers are Grace Taylor Vintage, and Whimsy stack. I used a Martha Stewart lacy-edged punch, on the polka-dot paper, and inked the edges to make it pop.

The cardstock is just a plain peach colour, so I punched stars out of black card to jazz it up a bit!

Hope you have a great day!

Saturday, 14 May 2011

Hexagonal exploding box!

I was after a crafty Mothers Day present for my mother and mother-in-law, and saw one of these in a magazine, so I thought I would have a go! The finished product did look smaller than in the magazine, so you will need to use passport size photos, but if you enlarge the template, you could use bigger pictures.

I found the ideal template for my exploding box here:

So here is how I did it, please excuse the dirty mat, I'm a messy crafter :)

Here is the base layer, the best way I could think of to do this was to trace the template onto baking paper, cut out the template, then trace onto cardstock, and cut out.


Repeat with other two layers:


You will need to adhere the photos to the paper before you put your box together. I used 2 sheets of Grace Taylor Vintage elegance and alternated them among the photos. As this was my first attempt and it was a Mothers Day gift, I wanted the focus to be the photos, not the box itself. I kept it very basic, and used a patterned cardstock for the lid. However, you can bling it up as much as you like! You don't even have to add photos to every tab. You can use some rub-ons, or embellishments, the only limit is the size and your imagination! :)

So here is the finished product, sorry I didn't add the lid, I was running very short on time making this:


Hope you enjoy! :)

Friday, 6 May 2011

Some tips I have picked up, to get you started :)

Tip number 1:

When painting Beyond The Page projects, baking paper is much better than newspaper or scrap paper to lay the project on, as the paint won't stick to the baking paper, thus leaving bits of paper on your project. I learned this one from my very artistic sister :)

Tip number 2:

Ok, so I am probably the LAST person on earth who worked this tip out, but to save loads of paper/cardstock when running an alphabet die through your cuttlebug, etc, rather than cut out a strip the length of your die (and wasting a lot of letters you don't need, or running the die through multiple times with multiple strips), cut out squares just big enough to cover each letter that you need, place on die, and run through the cuttlebug, etc. It won't matter if you catch a bit of the letter next door as well. After I worked this out, I managed to use only one strip to create a lengthy page title (for interest, it was "A Proper Vintage Gentleman", for the Graphic 45 Proper VIntage Gentleman collection which is a gorgeous collection if you like vintage/James Bond, etc.).

Welcome!

Hi and welcome to my blog! Here you will find pics of projects I have done, some hints and tips, and some tutorials, I hope you enjoy, and feel free to leave comments on my posts. All I ask is that if you comment, please be kind :)

As I have only set the blog up recently, it is still *obviously* under construction, so there will be fancy schmancy doo-dads, etc as I go along, and as I am VERY new to blogging, I'll be learning as I go it seems! Lol